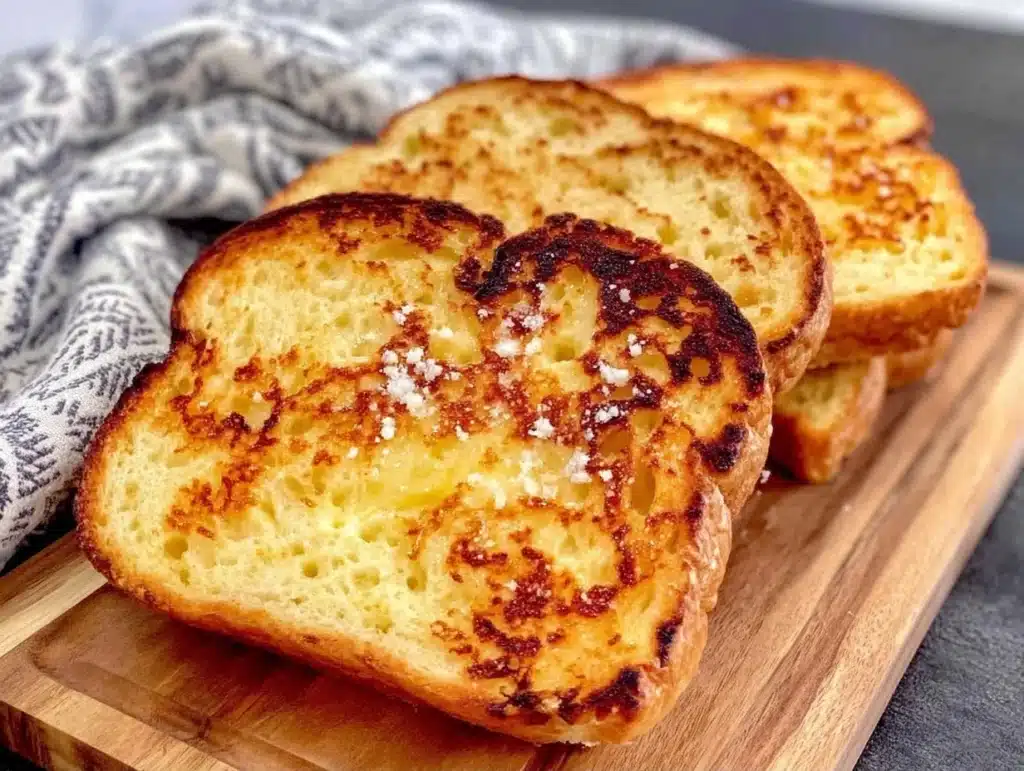
There is a specific kind of magic that happens when you pull a piece of Raising Cane’s bread out of the bag. It’s warm, it’s slightly sweet, and that crust? It’s shattering under your fingers like delicate glass. I remember the first time I really paid attention to it. I was sitting in a booth, waiting for my combo to arrive, and I tore into a piece of bread before the chicken hit the table. Honestly, it was better than the chicken.
Since then, I’ve made it my personal mission to recreate that experience at home. You know how it goes. You crave that specific texture—the soft, pillowy interior contrasted by the sugary, crunchy exterior—and you can’t just go out for it every day. That’s where this copycat raising canes bread recipe comes in. It’s not just about saving money, though that’s a nice bonus. It’s about that comfort food feeling.
I’ve tested this recipe dozens of times. I’ve tried different flours, different yeasts, and even different sugars. The version below is the winner. It uses simple pantry staples to deliver that exact taste. Whether you’re meal prepping or just want a late-night snack, this is the way to go. Let’s face it, homemade is always better, but this one is close enough to fool your taste buds.
Why You’ll Love This Recipe
Let’s be real for a second. Making bread from scratch usually sounds intimidating. You think about kneading, rising times, and getting the temperature just right. But this copycat raising canes bread is different. It’s designed for real life. I developed this recipe because I wanted something that felt indulgent but didn’t require a master’s degree in baking. It’s reliable, it’s forgiving, and it tastes incredible.
- Quick & Easy: You can have these ready in about an hour and a half. That’s faster than waiting in line for delivery. It’s perfect for those nights when you’re tired and just want something warm.
- Simple Ingredients: You don’t need fancy imports. Flour, yeast, sugar, butter, and milk. If you have these in your kitchen, you’re already halfway done. No special trips to the grocery store are needed.
- Perfect for Dipping: These are made for dipping. I know you love that combo sauce or that sweet tea. These breads are sturdy enough to hold up to any dip without falling apart.
- Crowd-Pleaser: My kids usually roll their eyes at “homemade” anything. But when I serve these, the bowls are empty in minutes. It’s a guaranteed hit for families and dinner parties alike.
- Unbelievably Delicious: The texture is spot-on. It’s not dense like a dinner roll, and it’s not airy like a baguette. It’s that perfect middle ground that feels like a treat.
What makes this recipe stand out is the technique for the crust. Most homemade breads stay soft. This one gets that signature snap. I use a specific method of brushing with butter and sugar right after baking. It creates that shiny, crunchy coating that makes you crave another piece immediately. It’s comfort food reimagined for your home kitchen.
What Ingredients You Will Need
This recipe relies on the quality of your basic ingredients. You don’t need anything exotic, but using good butter and fresh yeast makes a huge difference in the final flavor. The goal here is sweetness and crunch, so we lean heavily into the sugar and butter components. Here is what you need to gather before you start mixing.
- All-Purpose Flour: You’ll need about 3 to 4 cups. I recommend King Arthur Brand for its consistent protein content, which helps with that chewy texture. Bread flour works too, but all-purpose gives a softer crumb.
- Active Dry Yeast: One packet (2 1/4 teaspoons) is standard. Make sure it’s fresh. If your yeast is old, your bread won’t rise properly. I keep mine in the fridge to extend its life.
- Warm Milk: About 1 cup. This adds richness and helps activate the yeast. Whole milk is best for flavor, but 2% works fine if that’s all you have.
- Unsalted Butter: You need butter for two purposes. Some goes into the dough for softness, and a lot goes on top for that crunchy crust. Use real butter, not margarine. The flavor difference is night and day.
- Granulated Sugar: We use sugar in the dough for browning and sweetness. For the topping, you’ll need a mix of sugar and cinnamon. This is what creates that signature coating.
- Egg: One large egg, beaten. This goes into the dough to help bind everything and add structure. It also helps the dough brown nicely in the oven.
- Salt: One teaspoon. Salt balances the sweetness. Don’t skip it, or the bread will taste flat.
- Vegetable Oil: A tablespoon for greasing the bowl. This prevents sticking and helps the dough rise evenly.
If you want to get fancy, you can add a pinch of nutmeg to the cinnamon sugar topping, but the classic version is usually the best. Also, if you’re out of milk, you can use water, but the bread won’t be as rich. Keep an eye on the flour amount. Every kitchen is different, and humidity affects how much flour your dough absorbs.
Equipment Needed
You don’t need a fancy kitchen to make this. Basic tools will do the job just fine. I use a large mixing bowl for combining the dough. A stand mixer with a dough hook is great if you have one, but I often knead by hand. It’s good exercise, honestly.
For baking, you’ll need a baking sheet. I prefer a heavy-duty one because it conducts heat evenly. A silicone baking mat is helpful too, as it prevents sticking and makes cleanup easier. If you don’t have a mat, parchment paper works well. You’ll also need a pastry brush for applying the butter. Silicone brushes are easy to clean and handle heat well.
A digital kitchen scale is the most accurate way to measure flour, but cups work if you spoon and level them. Don’t pack the flour into the cup, or your bread will be dense. Finally, an oven thermometer is a nice touch. Ovens can be inaccurate, and knowing your true temperature helps ensure consistent results.
How to Make Copycat Raising Cane’s Bread

- Activate the Yeast: Start by warming your milk. It should be about 110°F (43°C). It’s warm to the touch but not hot. Pour it into a large bowl and sprinkle in the yeast and one tablespoon of sugar. Let it sit for 5 to 10 minutes. You’ll see a foamy layer form on top. This means your yeast is alive and ready to work. If it doesn’t foam, start over with fresh yeast.
- Mix the Dough: To the yeast mixture, add the beaten egg, the remaining sugar, and the salt. Whisk these together until combined. Now, add the flour gradually. If you’re using a stand mixer, start on low speed. If you’re mixing by hand, stir with a wooden spoon until it becomes too thick. Add about 3 cups of flour first. The dough will be shaggy and sticky. This is normal.
- Knead the Dough: Turn the dough out onto a lightly floured surface. Knead it for about 5 to 7 minutes. Push the dough away with the heel of your hand, fold it over, and turn it. Add more flour a little at a time if it’s too sticky, but try not to add too much. You want a soft, slightly tacky dough. It should spring back when you poke it. This step develops the gluten, which gives the bread its chew.
- First Rise: Lightly grease a clean bowl with vegetable oil. Place the dough in the bowl and turn it over to coat all sides. Cover the bowl with plastic wrap or a damp kitchen towel. Let it rise in a warm, draft-free spot for about 1 to 1.5 hours. It should double in size. This is the time to preheat your oven to 375°F (190°C).
- Shape the Buns: Punch down the risen dough to release the air. Divide it into 6 equal pieces. Roll each piece into a smooth ball. Place them on your prepared baking sheet, leaving about 2 inches between each one. They need space to expand. Cover them loosely and let them rise again for 20 to 30 minutes. They should look puffy.
- Bake: Place the baking sheet in the oven. Bake for 12 to 15 minutes. The bread should be golden brown on top. If they start browning too quickly, you can tent them with foil. You’ll know they’re done if they sound hollow when you tap the bottom.
- The Topping: While the bread bakes, melt the butter for the topping in a small saucepan. Once the bread comes out of the oven, brush the tops generously with the melted butter. Immediately sprinkle a mixture of sugar and cinnamon over the hot butter. The heat will help the sugar adhere and start to melt slightly.
- Final Cool: Let the bread cool on the baking sheet for about 5 minutes before eating. This allows the structure to set. Serve them warm for the best texture.
Cooking Tips & Techniques
Getting the dough consistency right is the most important part. Beginners often add too much flour. Remember, dough should be soft. If it feels like a stiff ball, it will bake into a brick. Add liquid instead of more flour if it’s too dry. Also, don’t rush the rising process. Cold kitchens will slow things down. If your house is chilly, put the dough in a turned-off oven with just the light on for warmth.
When shaping the buns, try to create surface tension. Pull the edges of the dough under the ball. This helps them keep their round shape during the second rise. If they spread out too much, they’ll be flat and less fluffy. Also, be generous with the butter topping. That’s where the flavor is. Don’t be shy. The sugar needs the butter to stick and to caramelize slightly.
I once made these without letting the dough rise long enough. They were dense and heavy. Never skip the first rise. It’s what creates the air pockets. Trust the process. Also, check your oven temperature. If your buns are pale after 15 minutes, your oven might be running cool. If they’re burning on the bottom, your oven might be too hot. Adjust accordingly for your next batch.
Variations & Adaptations
This recipe is quite flexible. You can change it up depending on what you have or what you’re in the mood for. For a healthier option, you can substitute half of the all-purpose flour with whole wheat flour. The bread will be denser and nuttier, but still delicious. Just add a little extra water if needed.
If you want a different flavor profile, try adding vanilla extract to the dough. It adds a nice aromatic sweetness. You can also mix chopped nuts or dried fruit into the dough before the first rise. For a savory twist, skip the sugar in the topping and use garlic powder and parmesan cheese instead. These make great appetizers for parties.
You can also freeze the shaped, unbaked buns. Place them on a tray and freeze them solid. Then transfer them to a bag. When you want fresh bread, let them thaw and rise, then bake as normal. This is great for meal prep. You can have warm bread ready whenever you need it. I often do this on Sundays for the week ahead.
Serving & Storage Suggestions
These breads are best served warm. They are the perfect companion to a bowl of chili or a simple salad. I like to serve them with a side of honey butter or that classic Cane’s sauce. The crunch contrasts nicely with creamy dips. For a special occasion, serve them on a nice platter with a linen napkin. It feels fancy, even though it’s simple.
If you have leftovers, store them in an airtight container at room temperature for up to 2 days. They will stay soft. For longer storage, freeze them. Wrap them tightly in plastic wrap and then in foil. They will last for up to 3 months. To reheat, thaw them and warm them in the oven for 5 minutes. This restores the crispiness of the crust. Don’t microwave them, or they’ll become chewy and tough.
The flavors actually meld nicely over the first day. The sugar continues to soak into the crust slightly. So, day two is still pretty good. Just be sure to reheat them to get that fresh-baked feel. They don’t keep well in the fridge, as the cold makes the bread go stale faster. Stick to room temp or freezer.
Nutritional Information & Benefits
While this is a treat, it’s not entirely devoid of nutrition. The flour provides carbohydrates for energy, and the milk adds some protein and calcium. Butter offers fat, which helps with satiety. However, these are calorie-dense due to the sugar and butter. Enjoy them in moderation. One bun is roughly 250-300 calories, depending on size and topping amount.
For those watching their sugar intake, you can reduce the sugar in the dough by half. The crust will be less sweet but still flavorful. If you are gluten-sensitive, you can use a gluten-free flour blend, but the texture will be different. It won’t have the same chew. This recipe is not vegan due to the milk and butter, but you can swap for plant-based alternatives if needed.
Conclusion
Making copycat raising canes bread at home is easier than you think. It brings that fast-food comfort to your kitchen without the drive-thru wait. The process is simple, the ingredients are basic, and the result is incredibly satisfying. I hope you try this recipe and enjoy it as much as I do. It’s become a staple in my house for quick dinners and late-night snacks.
Feel free to tweak the recipe to suit your taste. Add more cinnamon, less sugar, or different toppings. It’s your kitchen, after all. I’d love to hear how it turns out for you. Leave a comment below with your thoughts or any variations you tried. Share your photos if you can. It’s always fun to see how others make it their own. Happy baking!
Frequently Asked Questions
Can I use instant yeast instead of active dry yeast?
Yes, you can. Instant yeast doesn’t need to be activated in warm milk first. You can mix it directly with the flour. Just use the same amount. The results will be very similar.
Why did my bread turn out dense?
This usually happens if you add too much flour or if the yeast was dead. Make sure your milk isn’t too hot, or it will kill the yeast. Also, don’t pack the flour into your measuring cup. Spoon it in and level it off.
How do I make the crust extra crunchy?
Brush the bread with butter immediately after taking it out of the oven. Sprinkle the cinnamon sugar on while it’s hot. You can also broil them for the last minute or two, but watch them closely so they don’t burn.
Can I make the dough ahead of time?
Yes. After the first rise, you can punch it down, cover it tightly, and refrigerate it overnight. Let it come to room temperature and do the second rise before baking. This is great for planning ahead.
What can I serve with this bread?
It pairs well with soups, stews, and salads. It’s also great on its own with butter and jam. For a full meal, serve it alongside fried chicken or a burger. It’s very versatile.
Pin This Recipe!


Copycat Raising Canes Bread: 3-Ingredient Easy Recipe
- Total Time: 1 hour 45 minutes
- Yield: 6 servings 1x
Description
Recreate the warm, slightly sweet, and crunchy bread from Raising Cane’s at home with this easy copycat recipe. It features a soft, pillowy interior and a sugary, crunchy exterior, perfect for dipping.
Ingredients
- 3 to 4 cups All-Purpose Flour
- 1 packet (2 1/4 teaspoons) Active Dry Yeast
- 1 cup Warm Milk (about 110°F/43°C)
- 1 tablespoon Granulated Sugar (for yeast activation)
- 1 large Egg, beaten
- Remaining Granulated Sugar (for dough)
- 1 teaspoon Salt
- Unsalted Butter (for dough and topping)
- 1 tablespoon Vegetable Oil (for greasing)
- Cinnamon and Sugar mixture (for topping)
Instructions
- Activate the yeast by warming milk to 110°F (43°C). Pour into a large bowl, sprinkle in yeast and 1 tablespoon of sugar, and let sit for 5-10 minutes until foamy.
- Add the beaten egg, remaining sugar, and salt to the yeast mixture. Whisk to combine.
- Gradually add about 3 cups of flour. Mix until the dough is shaggy and sticky.
- Knead the dough on a lightly floured surface for 5-7 minutes until soft and slightly tacky. Add more flour if necessary, but avoid making it stiff.
- Place dough in a bowl greased with vegetable oil, turning to coat. Cover and let rise in a warm spot for 1-1.5 hours until doubled in size.
- Preheat oven to 375°F (190°C). Punch down the dough and divide into 6 equal pieces. Roll into smooth balls.
- Place buns on a prepared baking sheet, leaving 2 inches between each. Cover loosely and let rise again for 20-30 minutes until puffy.
- Bake for 12-15 minutes until golden brown. If browning too quickly, tent with foil.
- While baking, melt butter for the topping. Immediately after baking, brush tops generously with melted butter.
- Sprinkle cinnamon sugar mixture over the hot buttered bread.
- Let cool for 5 minutes before serving warm.
Notes
Ensure yeast is fresh and milk is not too hot to avoid killing the yeast. Dough should be soft, not stiff. If your kitchen is cold, rise the dough in an oven with just the light on. For extra crunch, you can broil for the last 1-2 minutes, watching closely. Store leftovers in an airtight container at room temperature for up to 2 days, or freeze for up to 3 months.
- Prep Time: 30 minutes
- Cook Time: 15 minutes
- Category: Side Dish
- Cuisine: American
Nutrition
- Serving Size: 1 bread roll
- Calories: 275
- Sugar: 12
- Sodium: 350
- Fat: 8
- Saturated Fat: 4
- Carbohydrates: 45
- Fiber: 2
- Protein: 6
Keywords: Raising Cane's bread, copycat recipe, homemade bread, easy bread recipe, cinnamon sugar bread, comfort food, side dish